Inclusive Design: Colour Accessibility
UI/UX Design
User Research
Common misconceptions about colour accessibility
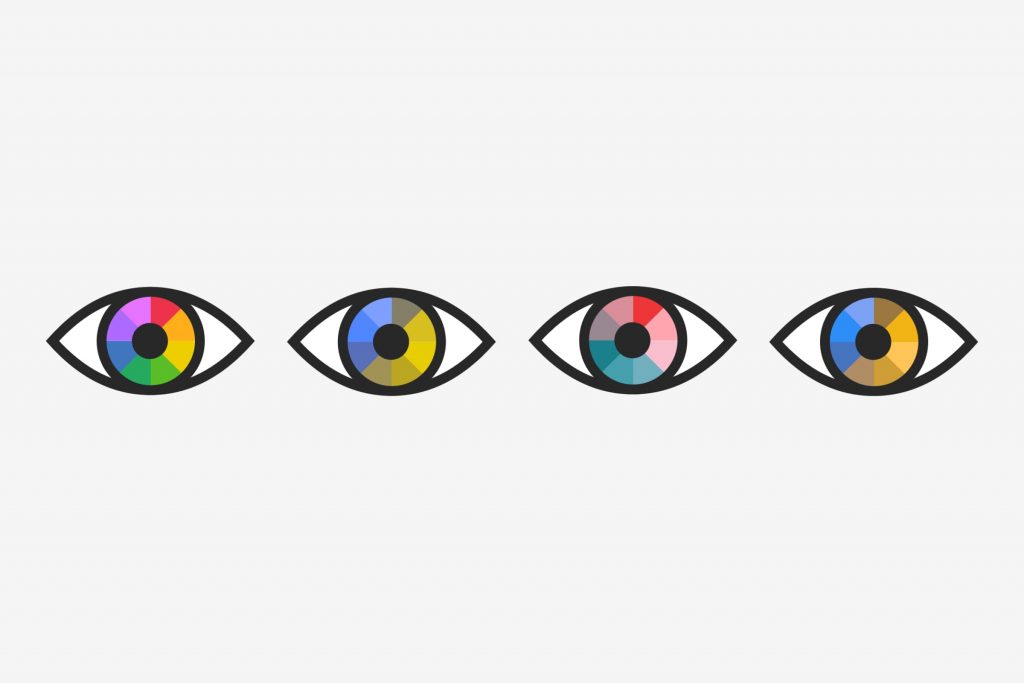
The total loss of colour in vision is extremely rare. And yet, the most widely-used term to describe people with difficulties seeing colour is ‘colour blind'.’ The term colour blindness is a blanket expression, to say the least. To begin talking about colour accessibility, it’s important to understand that it isn’t one size fits all.
Colour Vision Deficiency (CVD) is the best way to describe someone who has difficulty seeing colour. This is particularly important when you consider the impact CVD has globally. In fact, Colour Blind Awareness states there are approximately 300 million people with a form of CVD worldwide.
Creating an online environment for colour accessibility should be every UX/UI designer or product owner's priority, especially because being inclusive isn’t just an ethical best practice, there can now be legal implications. In 2021, UK Government regulations will require all public sector websites to comply with accessibility guidelines.
So, designing for CVD is a step that you must take as designers and digital product owners to include everyone. By designing for one, you will extend it to many. By incorporating inclusive colours in your designs, you can help not just those with a permanent disability but also those with temporary and situational limitations. For example, improved colour contrast helps those who are in bright conditions.
To address colour accessibility, this article will cover the following:
The official grading system for accessible colour contrast.
How to determine the most inclusive approach to colours in your designs.
How to design more inclusive UI elements (buttons, forms and more!)
Contrast Grading Standards
Contrast is graded as ‘A’, ‘AA’ and ‘AAA’. With the ‘AAA’ grading being the gold standard for accessibility.
The minimum level your contrast should be to pass W3C’s standards is AA. When checking your typeface contrast for buttons, background legibility or navigation bars, two versions will be graded. Regular type sizing and large.
Regular is defined by a regular weight and at 16px, the minimum standard for body text sizing. Large can be defined in two ways. The first is a bold weight at 18px, and the second is a regular weight at 24px.
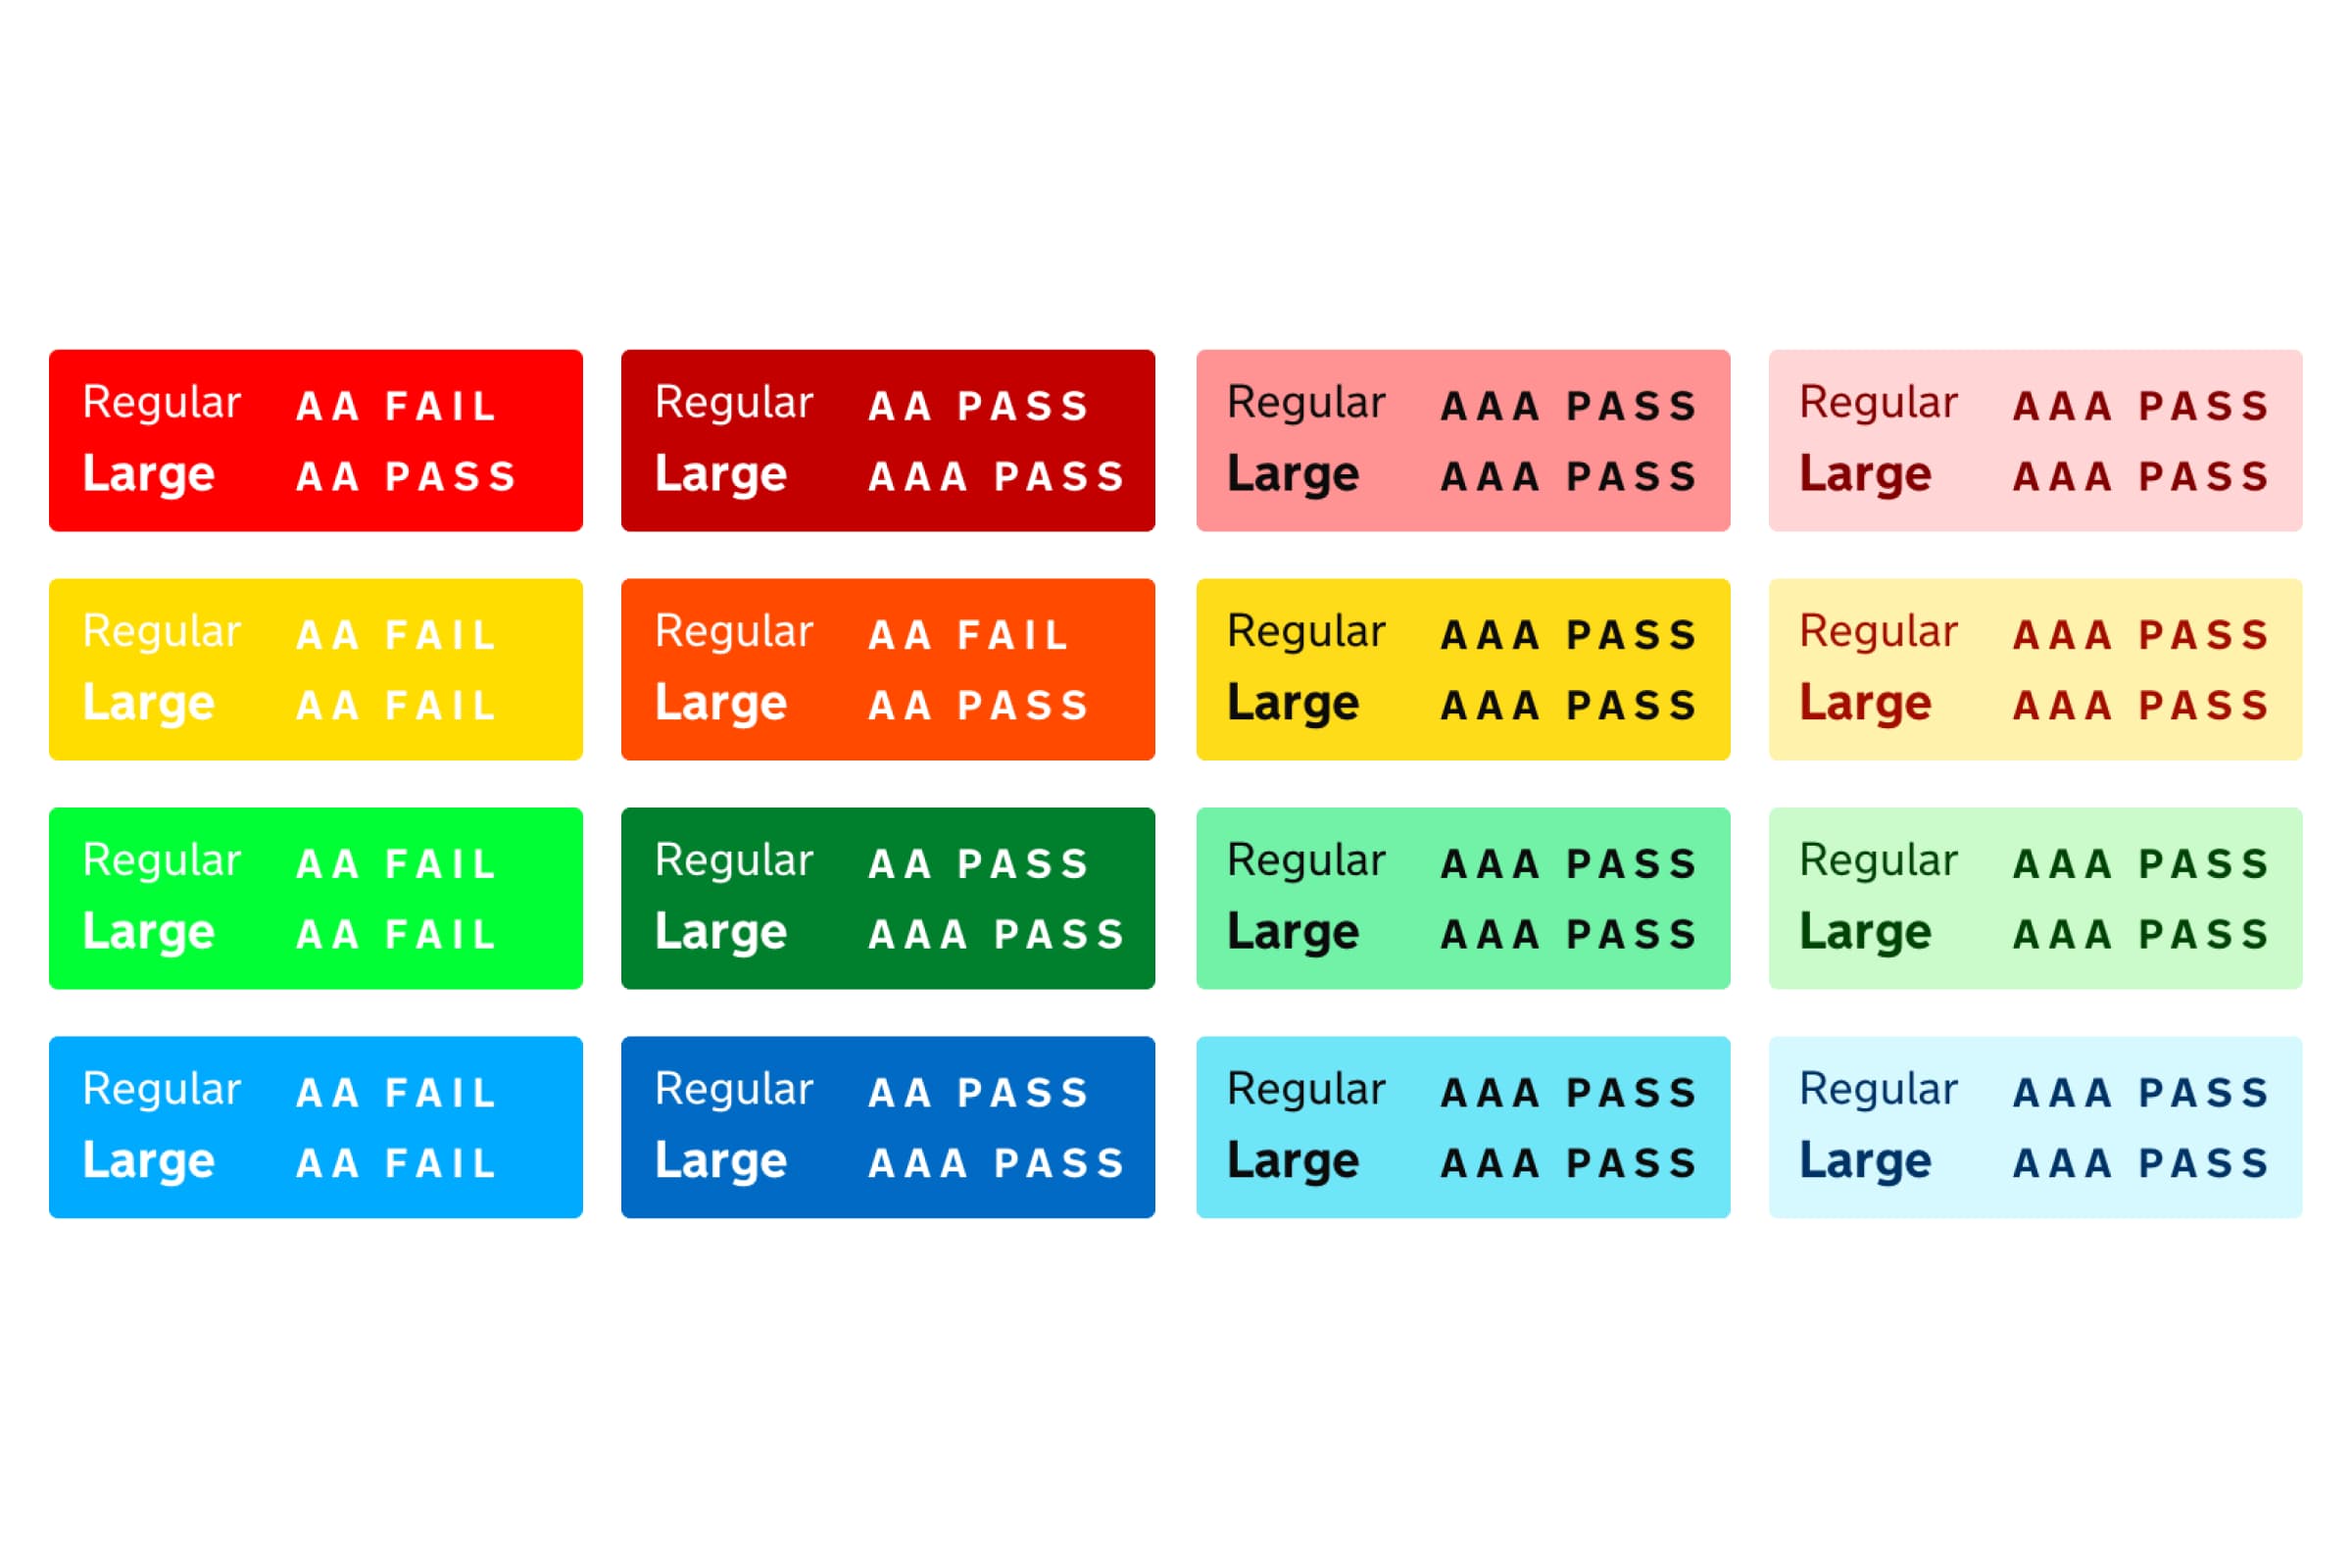
We’ve put together a chart above to demonstrate what fails and passes the contrast checker. It shouldn’t be revolutionary to know that white works better on darker hues, and black works better on lighter hues. As you move along the examples you’ll notice the colours are toned down and not bright neon like the left column. A softer tone is easier on the eyes.
Don’t feel the need to only stick with black or white either. Experiment with your brand colours to find what works for you.
There are plenty of options to check your contrast. Here are a few that we would recommend:
WCAG Contrast Checker(Web).
Colorable (Web).
Colorsafe (Web).
Stark (Sketch & Adobe XD Plugin).
The Best Colour Combinations for Accessibility
Now we’ve talked about contrast on a general accessibility level. We’ll now get into what you can do to be accessible for those who do have a colour vision deficiency.
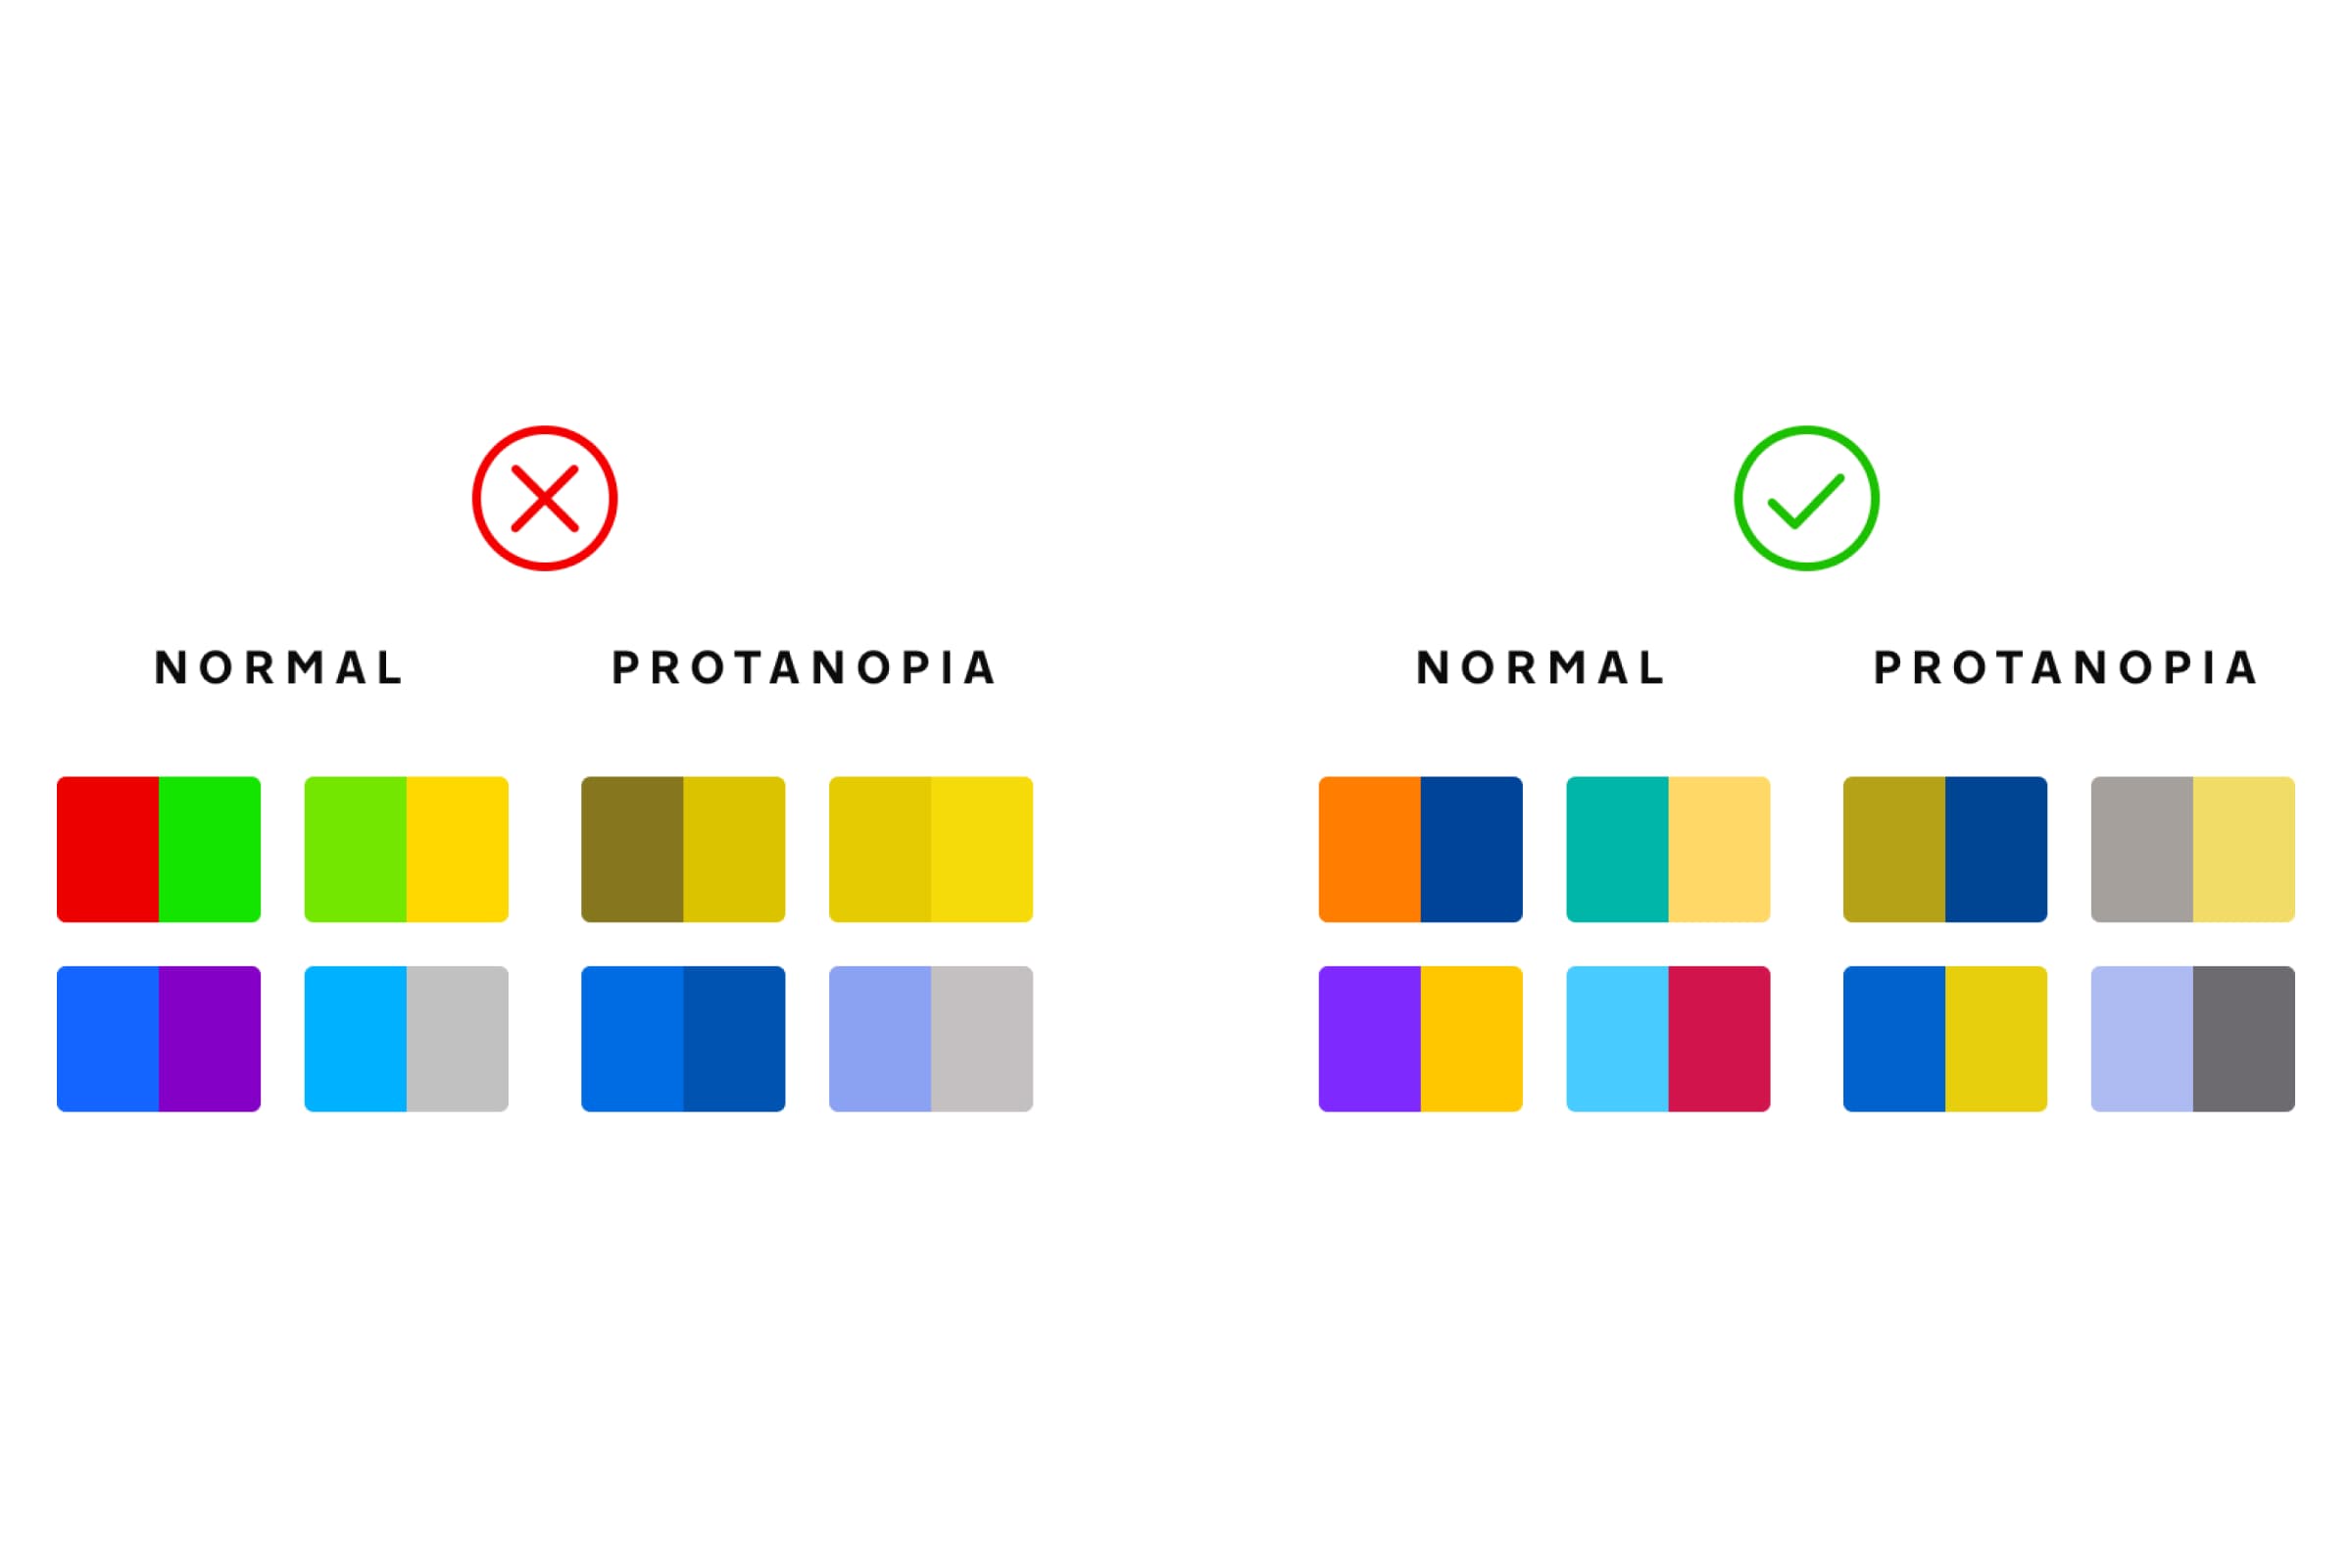
We’re going to continue the theme of contrast but instead, move on to the contrast between two or more colours. Red and green, seen by anyone with normal vision, are clearly a striking contrast when put together. We use these colours to distinguish between error and success, good and bad, slow and fast, and stop and start. But someone with Protanopia can only see yellow hues in their place.
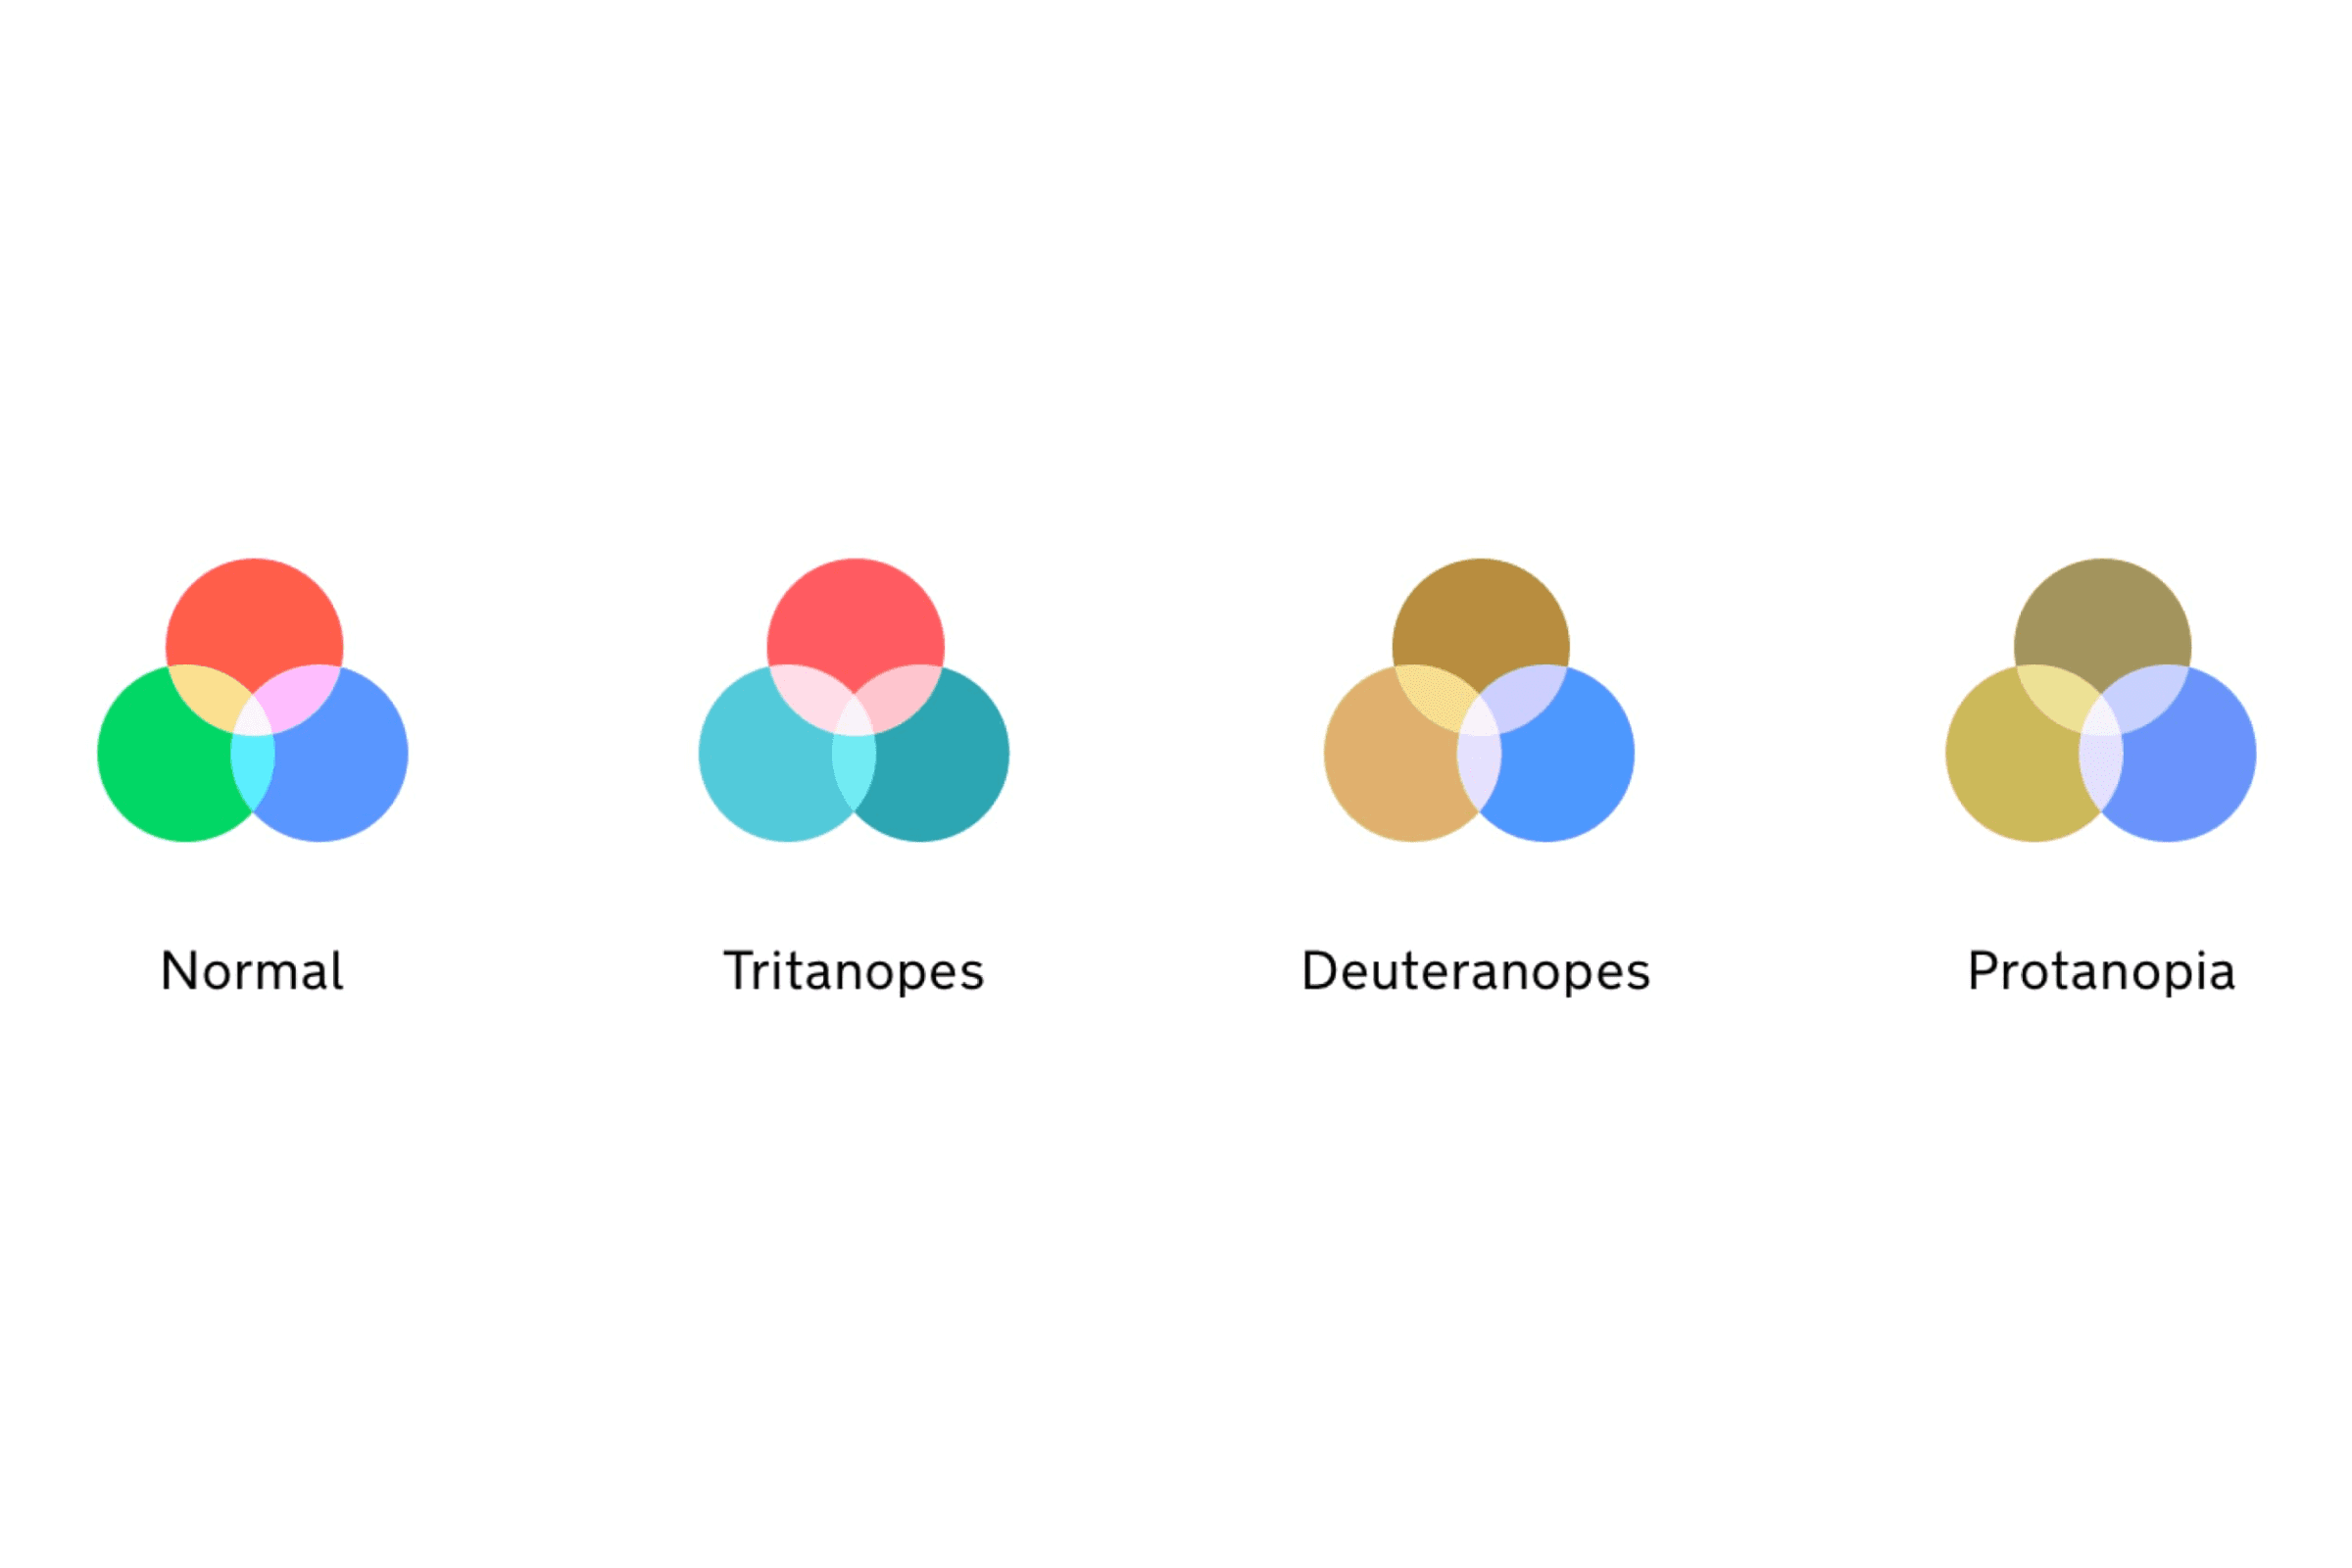
Normal vision can see all 3 cones of light, Red, Green and Blue. However, those with CVDs are split into 4 types:
Protanopia - Reduces sensitivity to red light.
Deuteranopia - Reduces sensitivity to green light.
Tritanopia - Reduces sensitivity to blue light.
Achromatopsia - A total loss or reduction of all three colours.
Colour Accessibility Checkers
Colour combinations to avoid with CVDs in mind are:
Red/Green
Light Green/Yellow
Blue/Purple
Blue/Grey
Green/Grey
Green/Blue
Green/Brown
Green/Black
The easiest way to check your colours and have a better understanding of your designs is to use a simulator to show you how a person with CVD would view your designs. Here are some helpful resources:
Using Patterns & Shapes for Inclusive Design
In this section, we’re going to talk about how patterns and the use of shapes can be the difference between your design being inclusive or not.
We’re going to start with a classic example of graphs. Think of a bar chart. You’ve used bright colours to represent each section, they complement and clash against each other to stand out on their own. But, in the below example, we’ve shown the difference between normal and tritanopia vision. We could have used the total loss of colour to represent the lack of contrast, but we wanted to represent all the types in our examples and not just rely on the other end of the scale.
You can be mindful of CVD when designing graphs by either using tones of one colour if you have a small number of sections or by using patterns to create a unique mark that’s distinguishable. Trello used patterns to create a “colour-blind friendly mode” for the application of labels. A great example where everyone is included in the design.
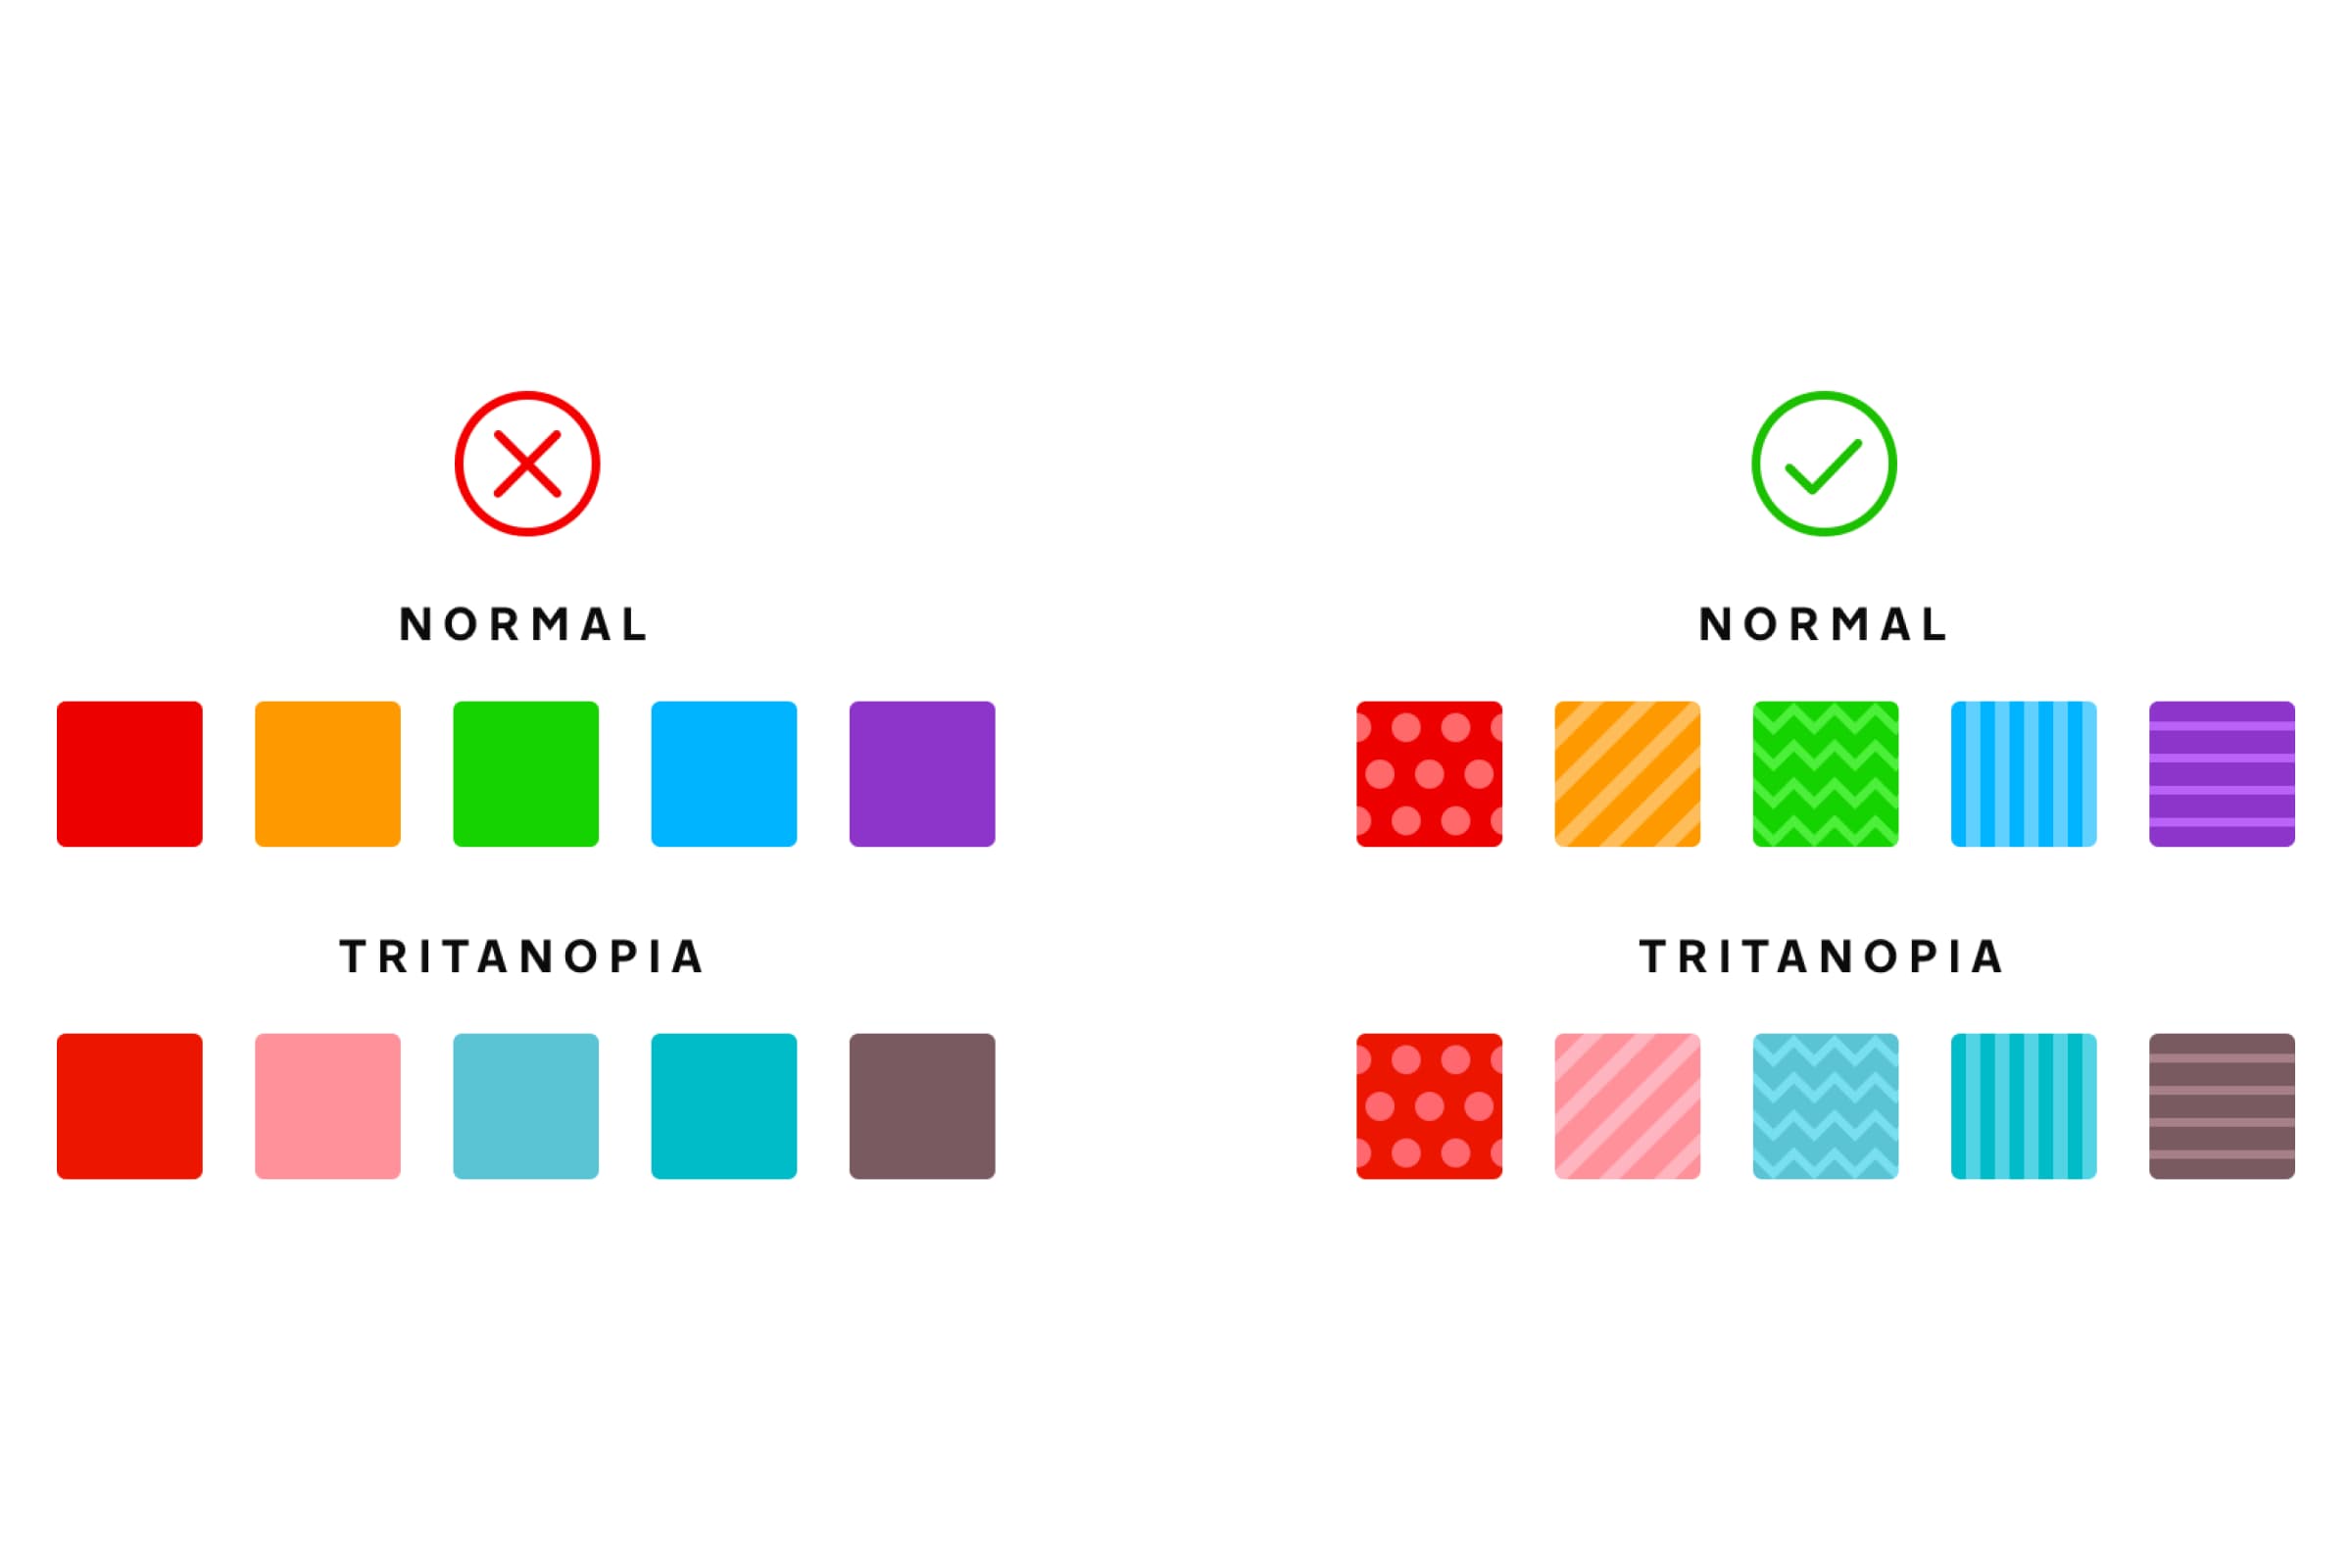
Let’s now talk about the use of shape. Using shapes to represent keys instead of just colours is a good use case. For example, using a traffic light system of green, yellow and red. Instead of relying on just colour, you can make the key a green circle, yellow triangle, and red square.
To demonstrate the importance of shape, let’s look at the difference between the two messaging apps. These are the states they use to show when a message is sent, delivered and read. The left example is a representation of WhatsApp, they’ve made sure to show the difference between sent and delivered messages, however, they fail at making a clear difference between a message being read. For some with total loss of colour, they would never have an idea if their message had been read.
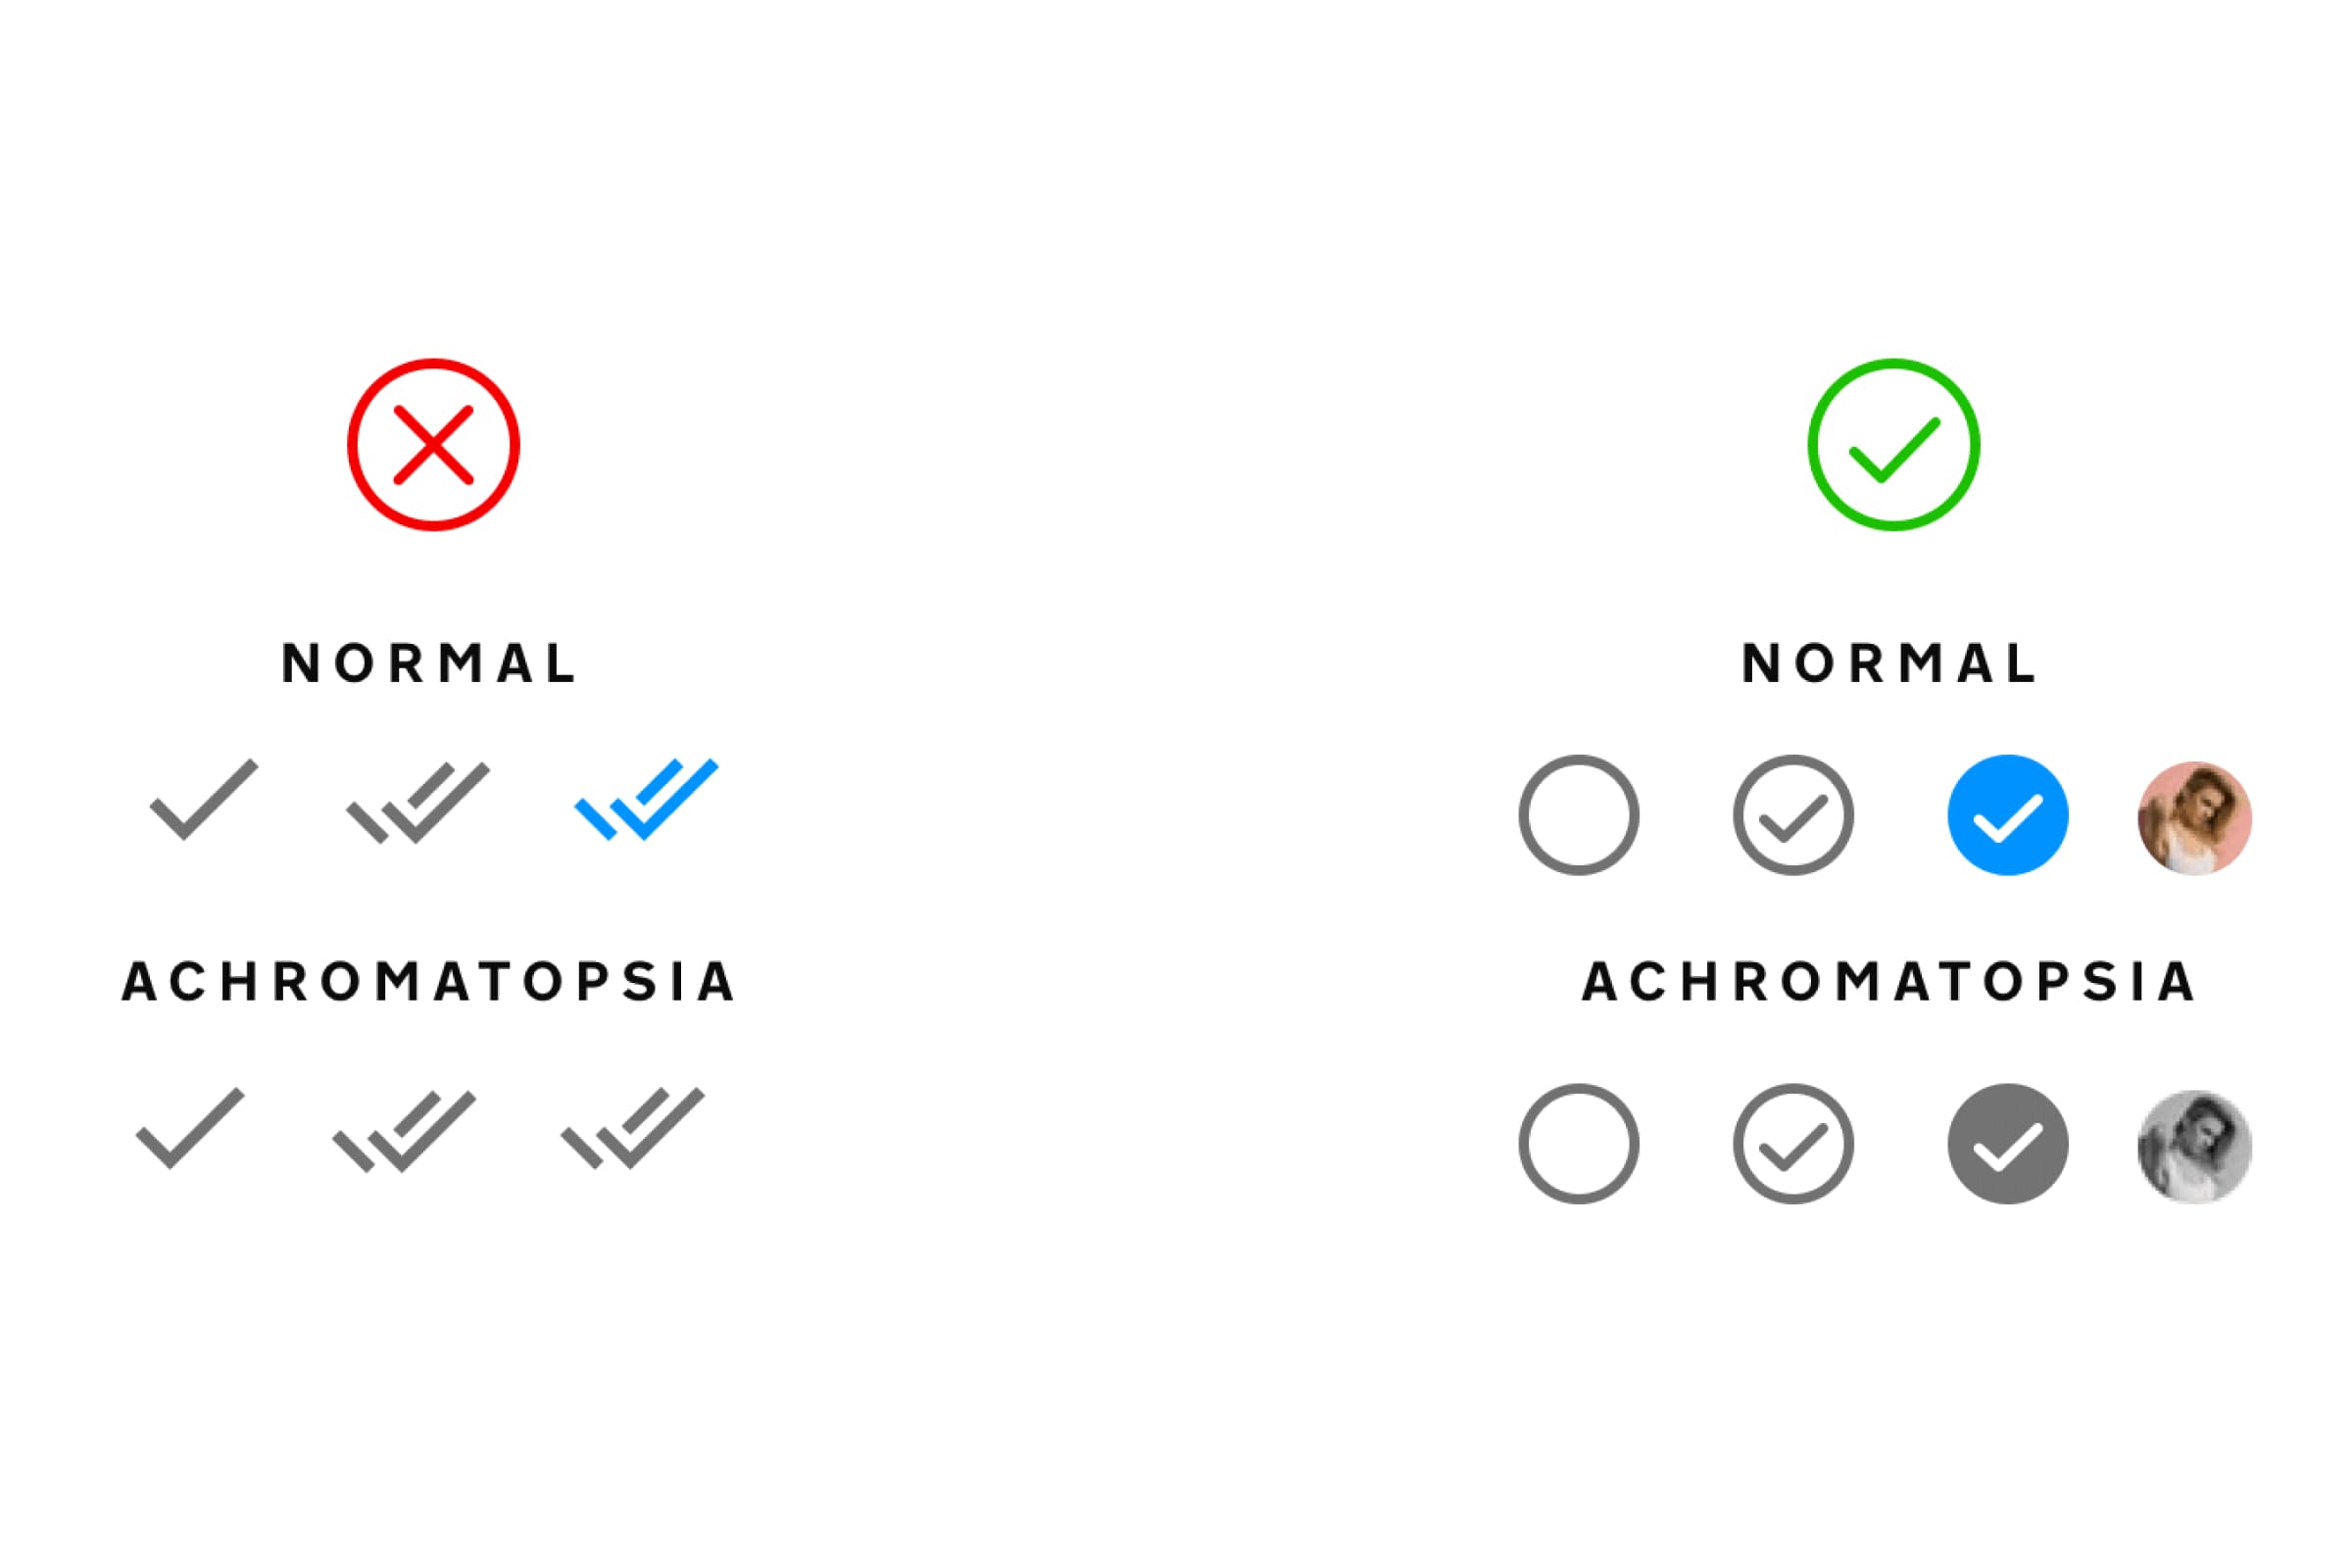
Messenger has clear states, though not changing the main shape of their icons. They use stoke and filled icons to visually show the difference which doesn’t rely on the need for colour to represent this.
A Better Approach to Buttons & Forms
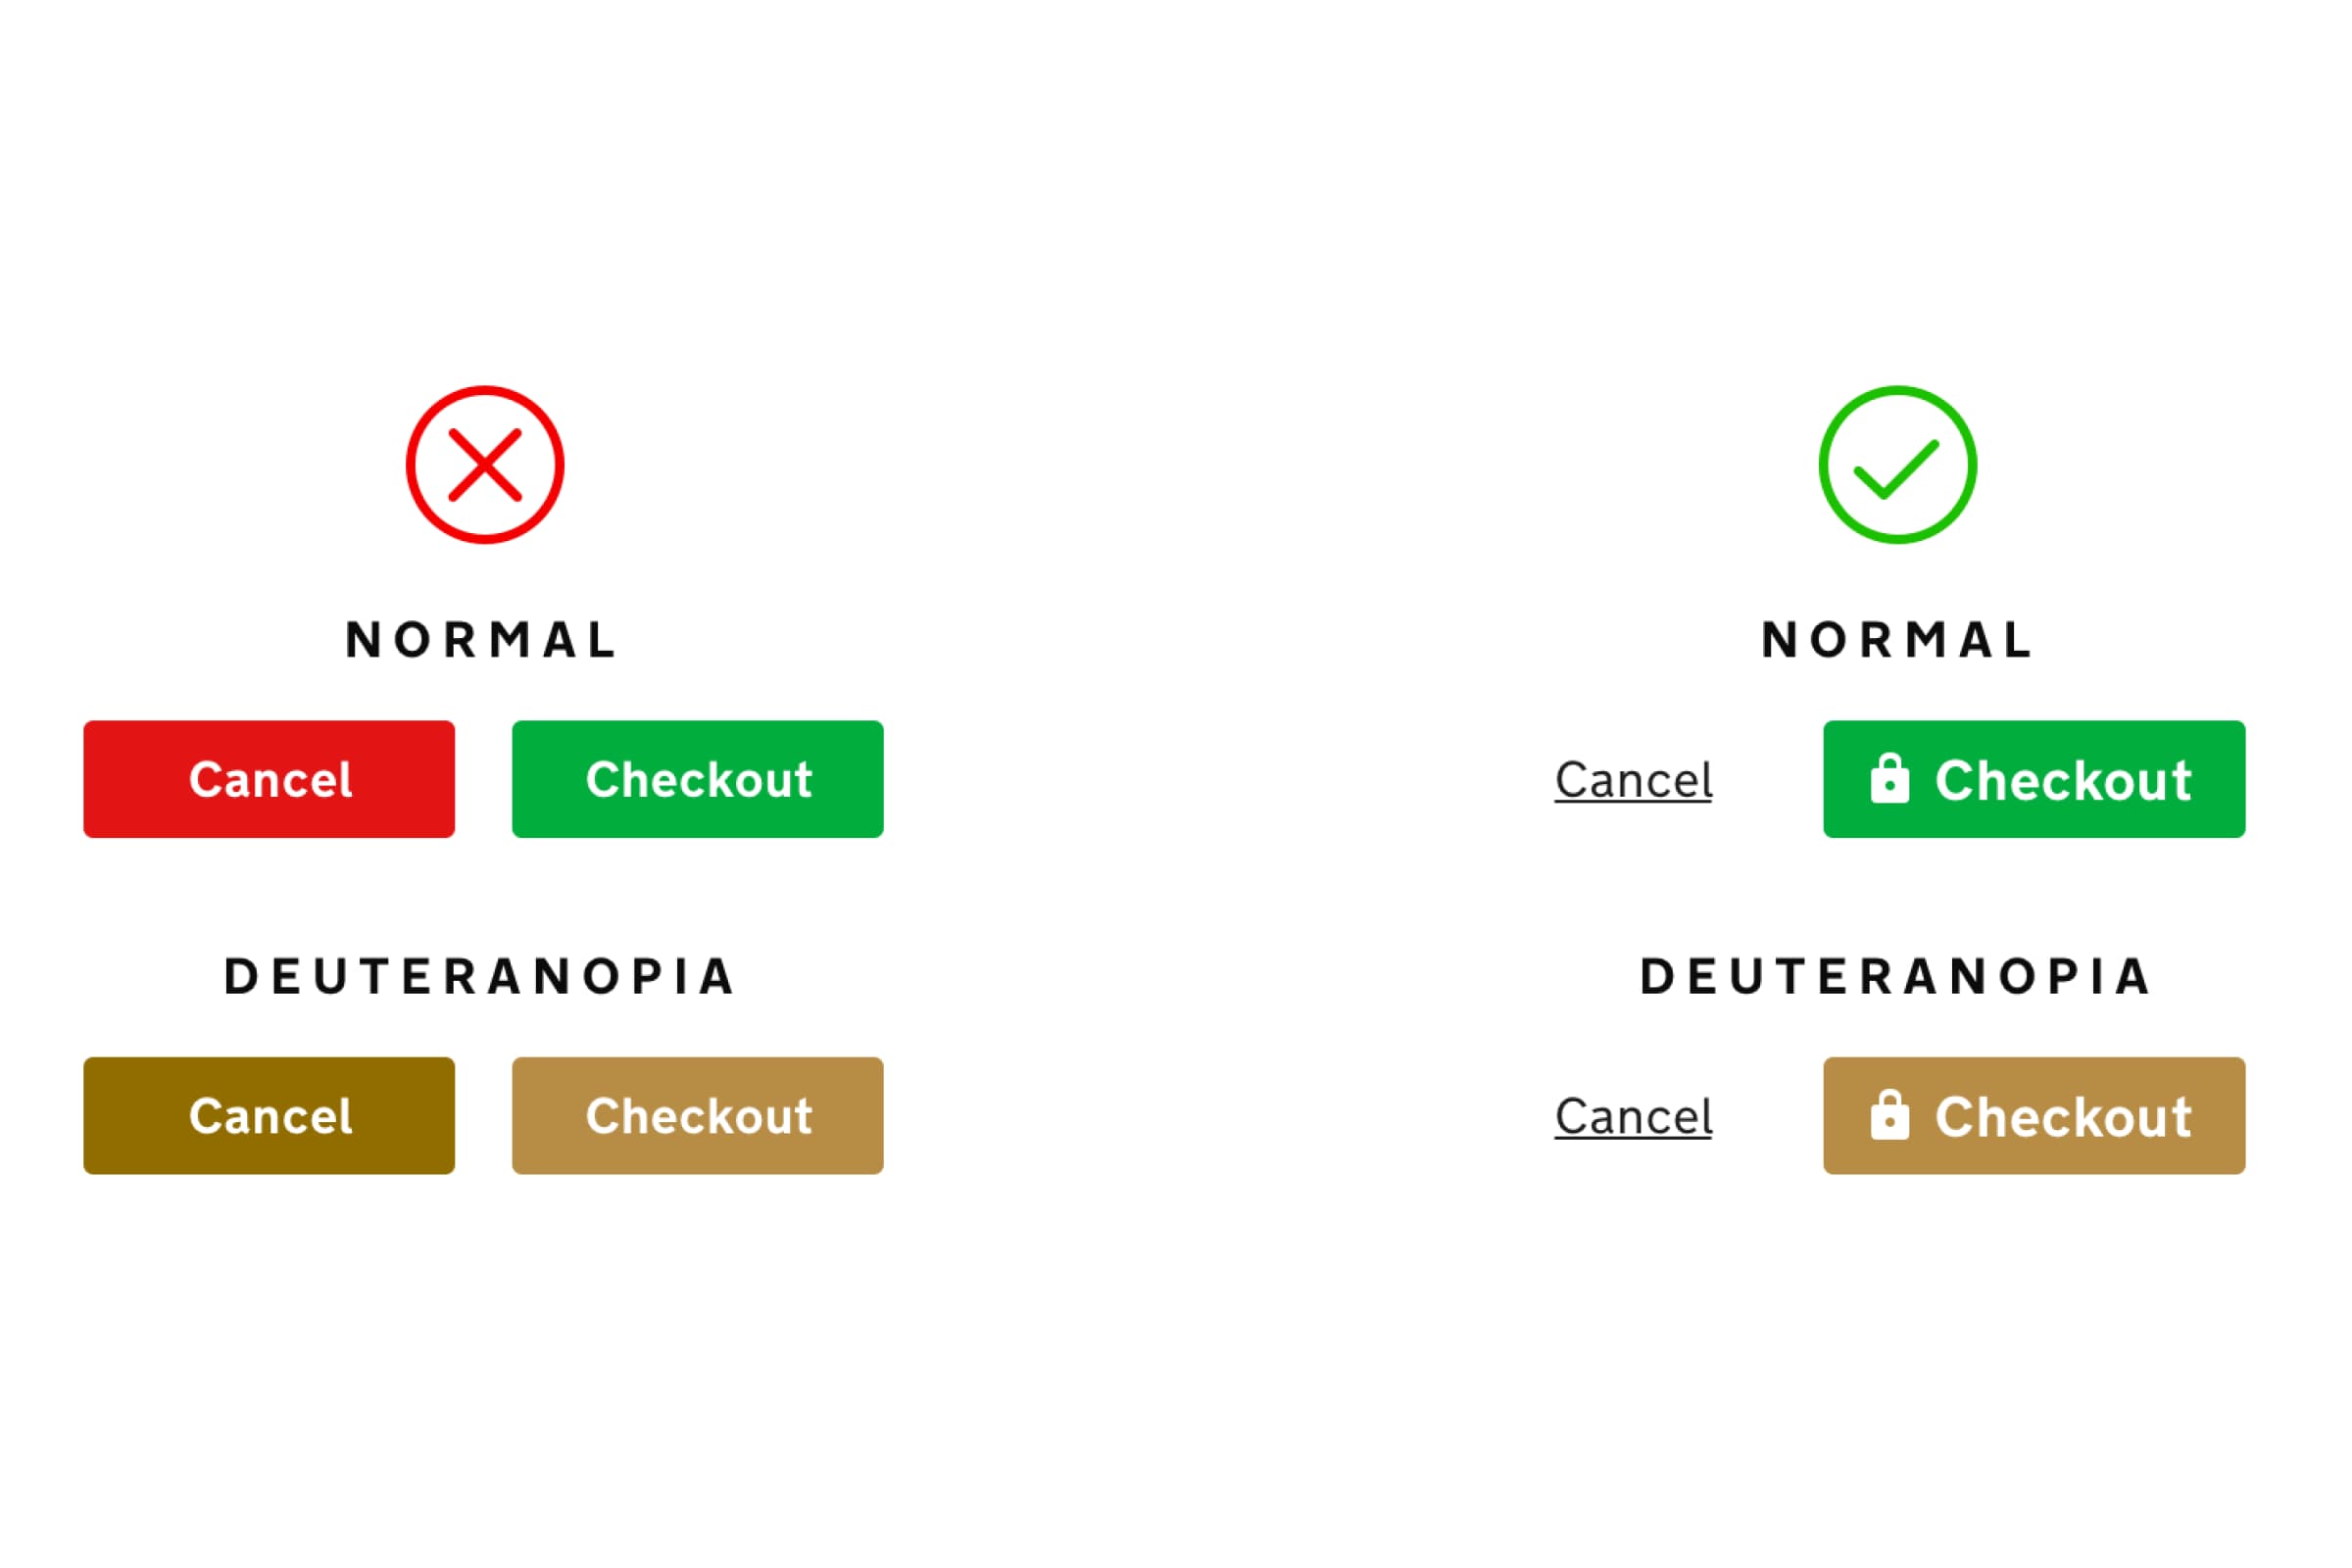
For buttons and form elements within your designs, there are many factors that you can use in order to not rely on colour for primary buttons or error states for forms. Play around with borders, type weight, type sizing, opacity, placement and the use of icons to make what you need to stand out. Also, don’t forget to underline your links if they’re not going to be in a button style.
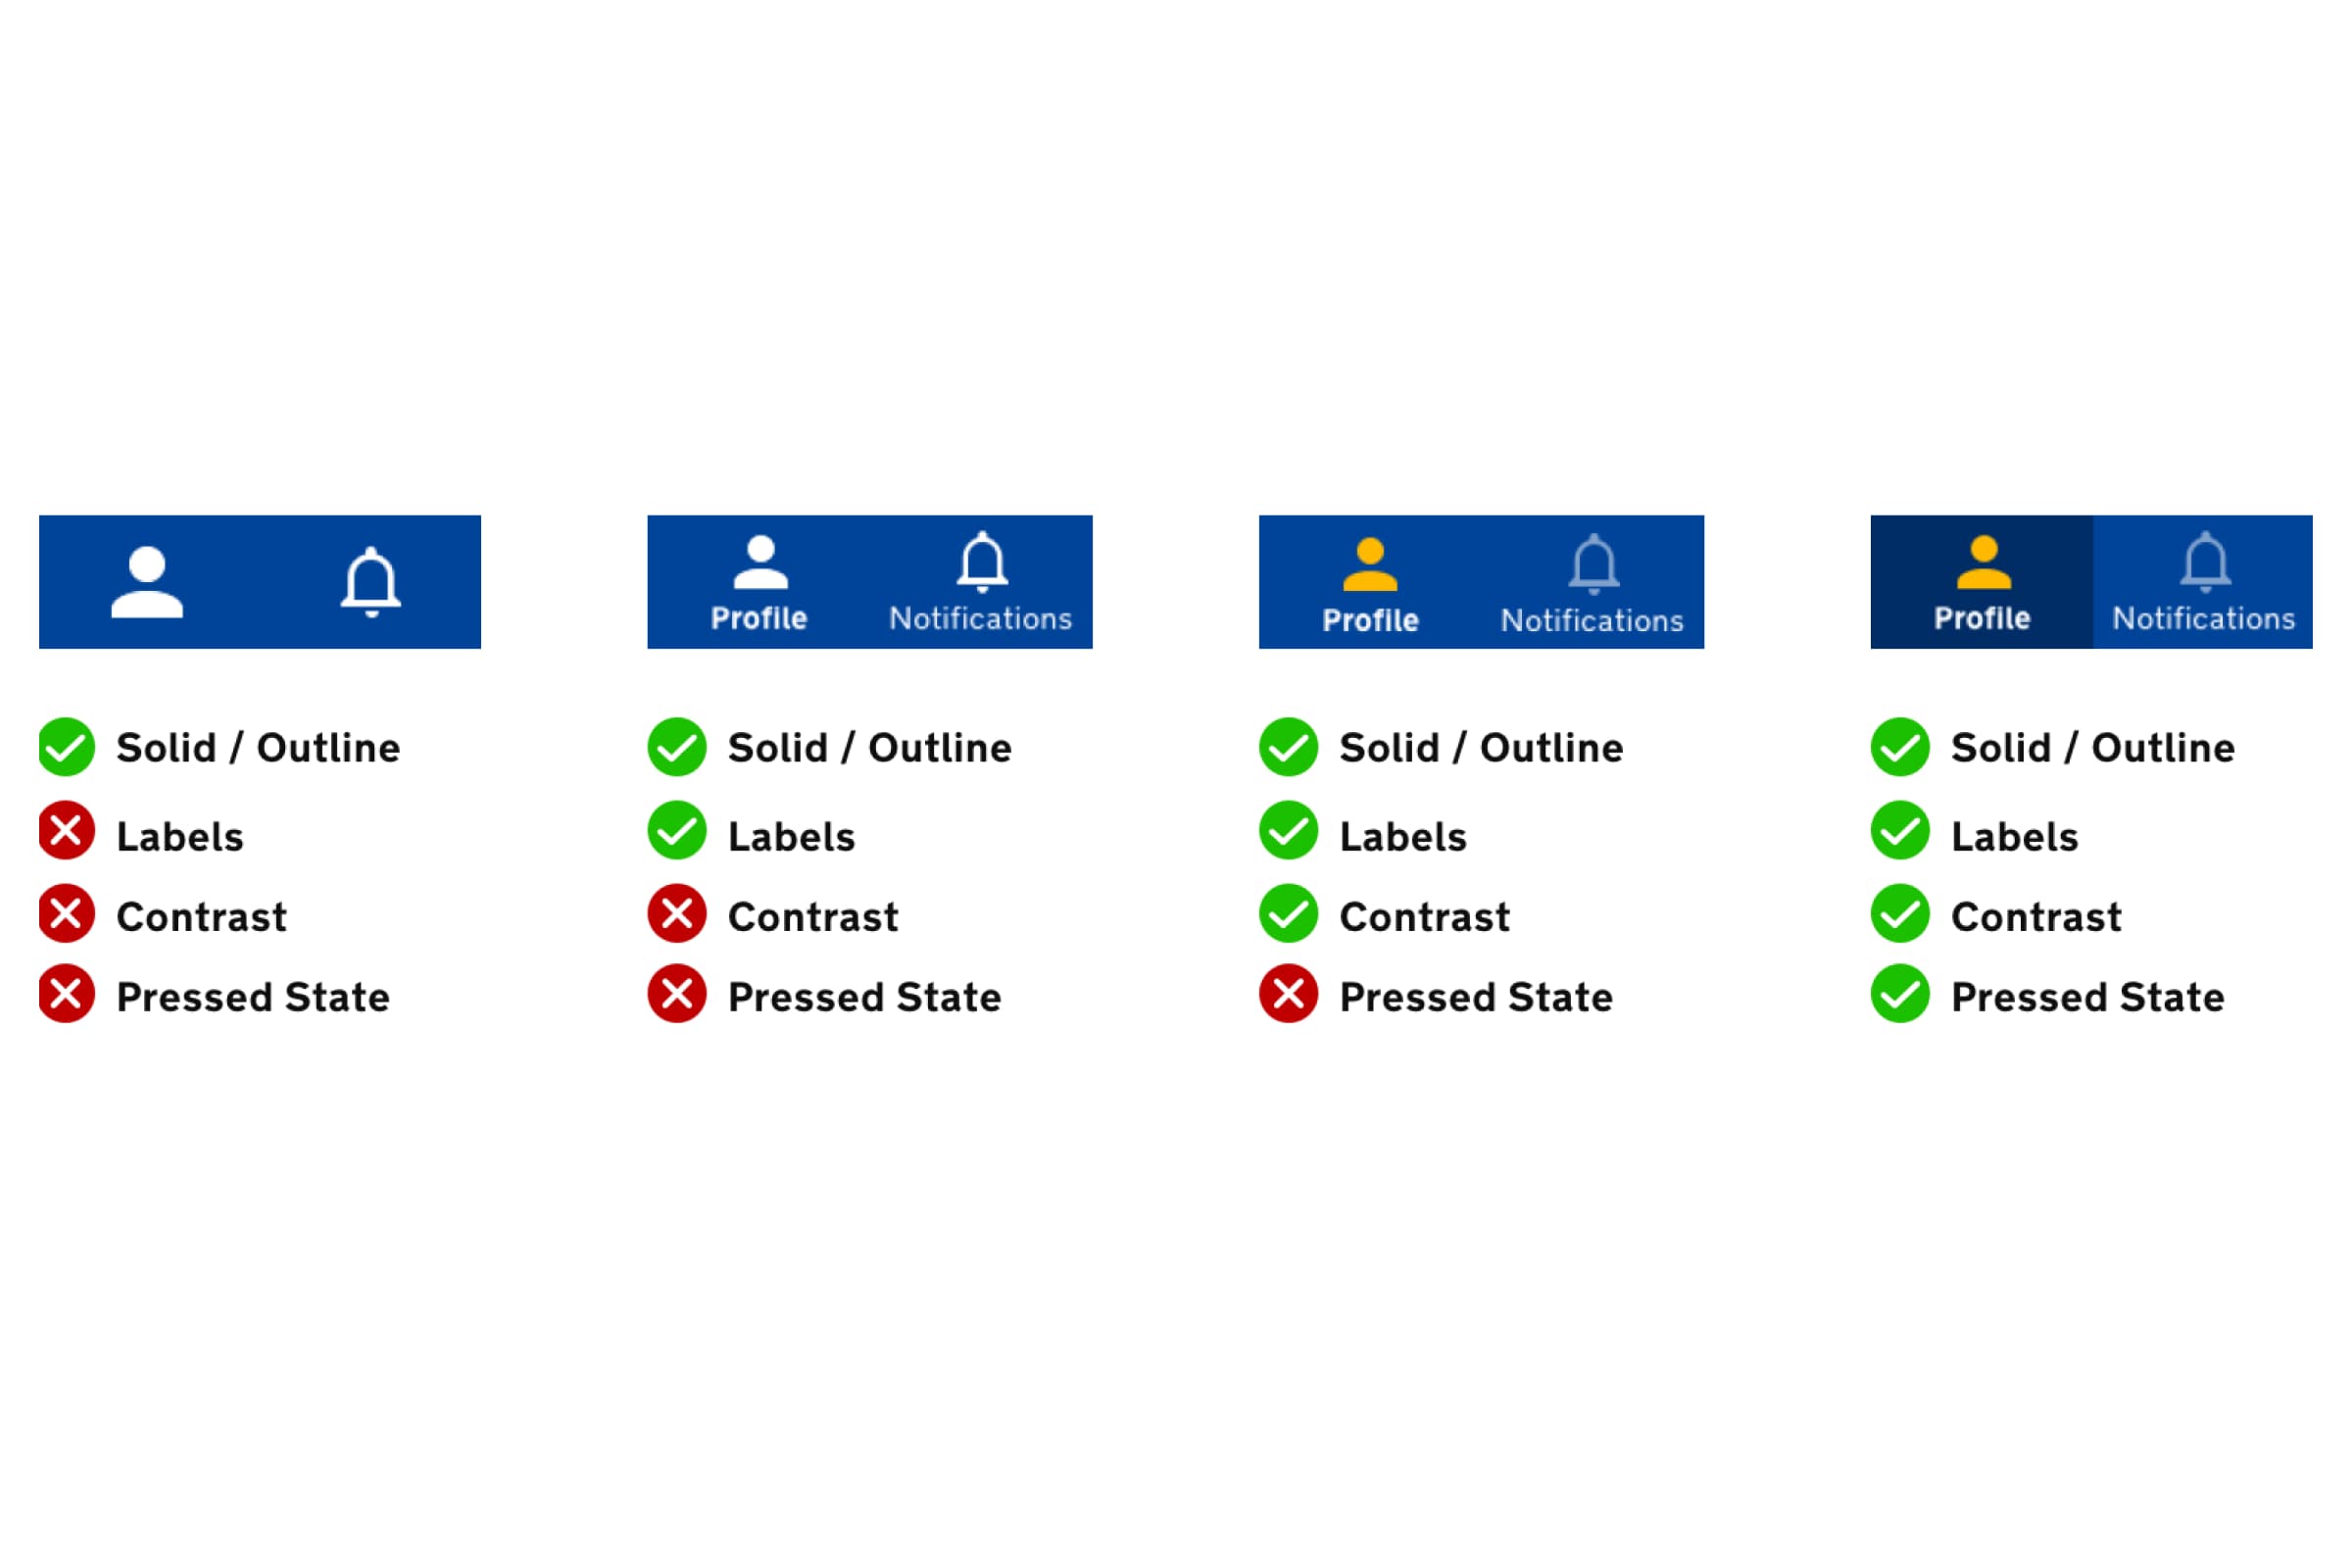
Below, we’ve put together an example of app bars. This is more of a guide than a rule. There are many popular apps that choose to only use icons for their navigation options. It’s worth noting that this works because of our familiarity with universal icons. We’re talking about colour and contrast though. The use of background contrast, opacity contrast between inactive tabs and differences in icons are all ways to make navigation perfectly clear.
Colour Descriptions
We tend to use colour as a way of personalising our own space. Twitter is an example of this, you can pick a theme colour for your profile. Twitter, in this instance, is not a fantastic representative of inclusive design. What they have got wrong with this feature is only providing squares of colour. All they have to do to make this feature more accessible is to provide a label with the colour name. It could be a list or it could be a hover tooltip. It’s such a simple addition to include.
Now personalising a Twitter page colour is just a nice-to-have feature, but not necessarily essential, so here is an example from the world of eCommerce. Amazon, eBay and Asos are all examples of companies that should have colour descriptions labelled correctly. However, there are some examples where they miss the mark. Let’s look at an example below.
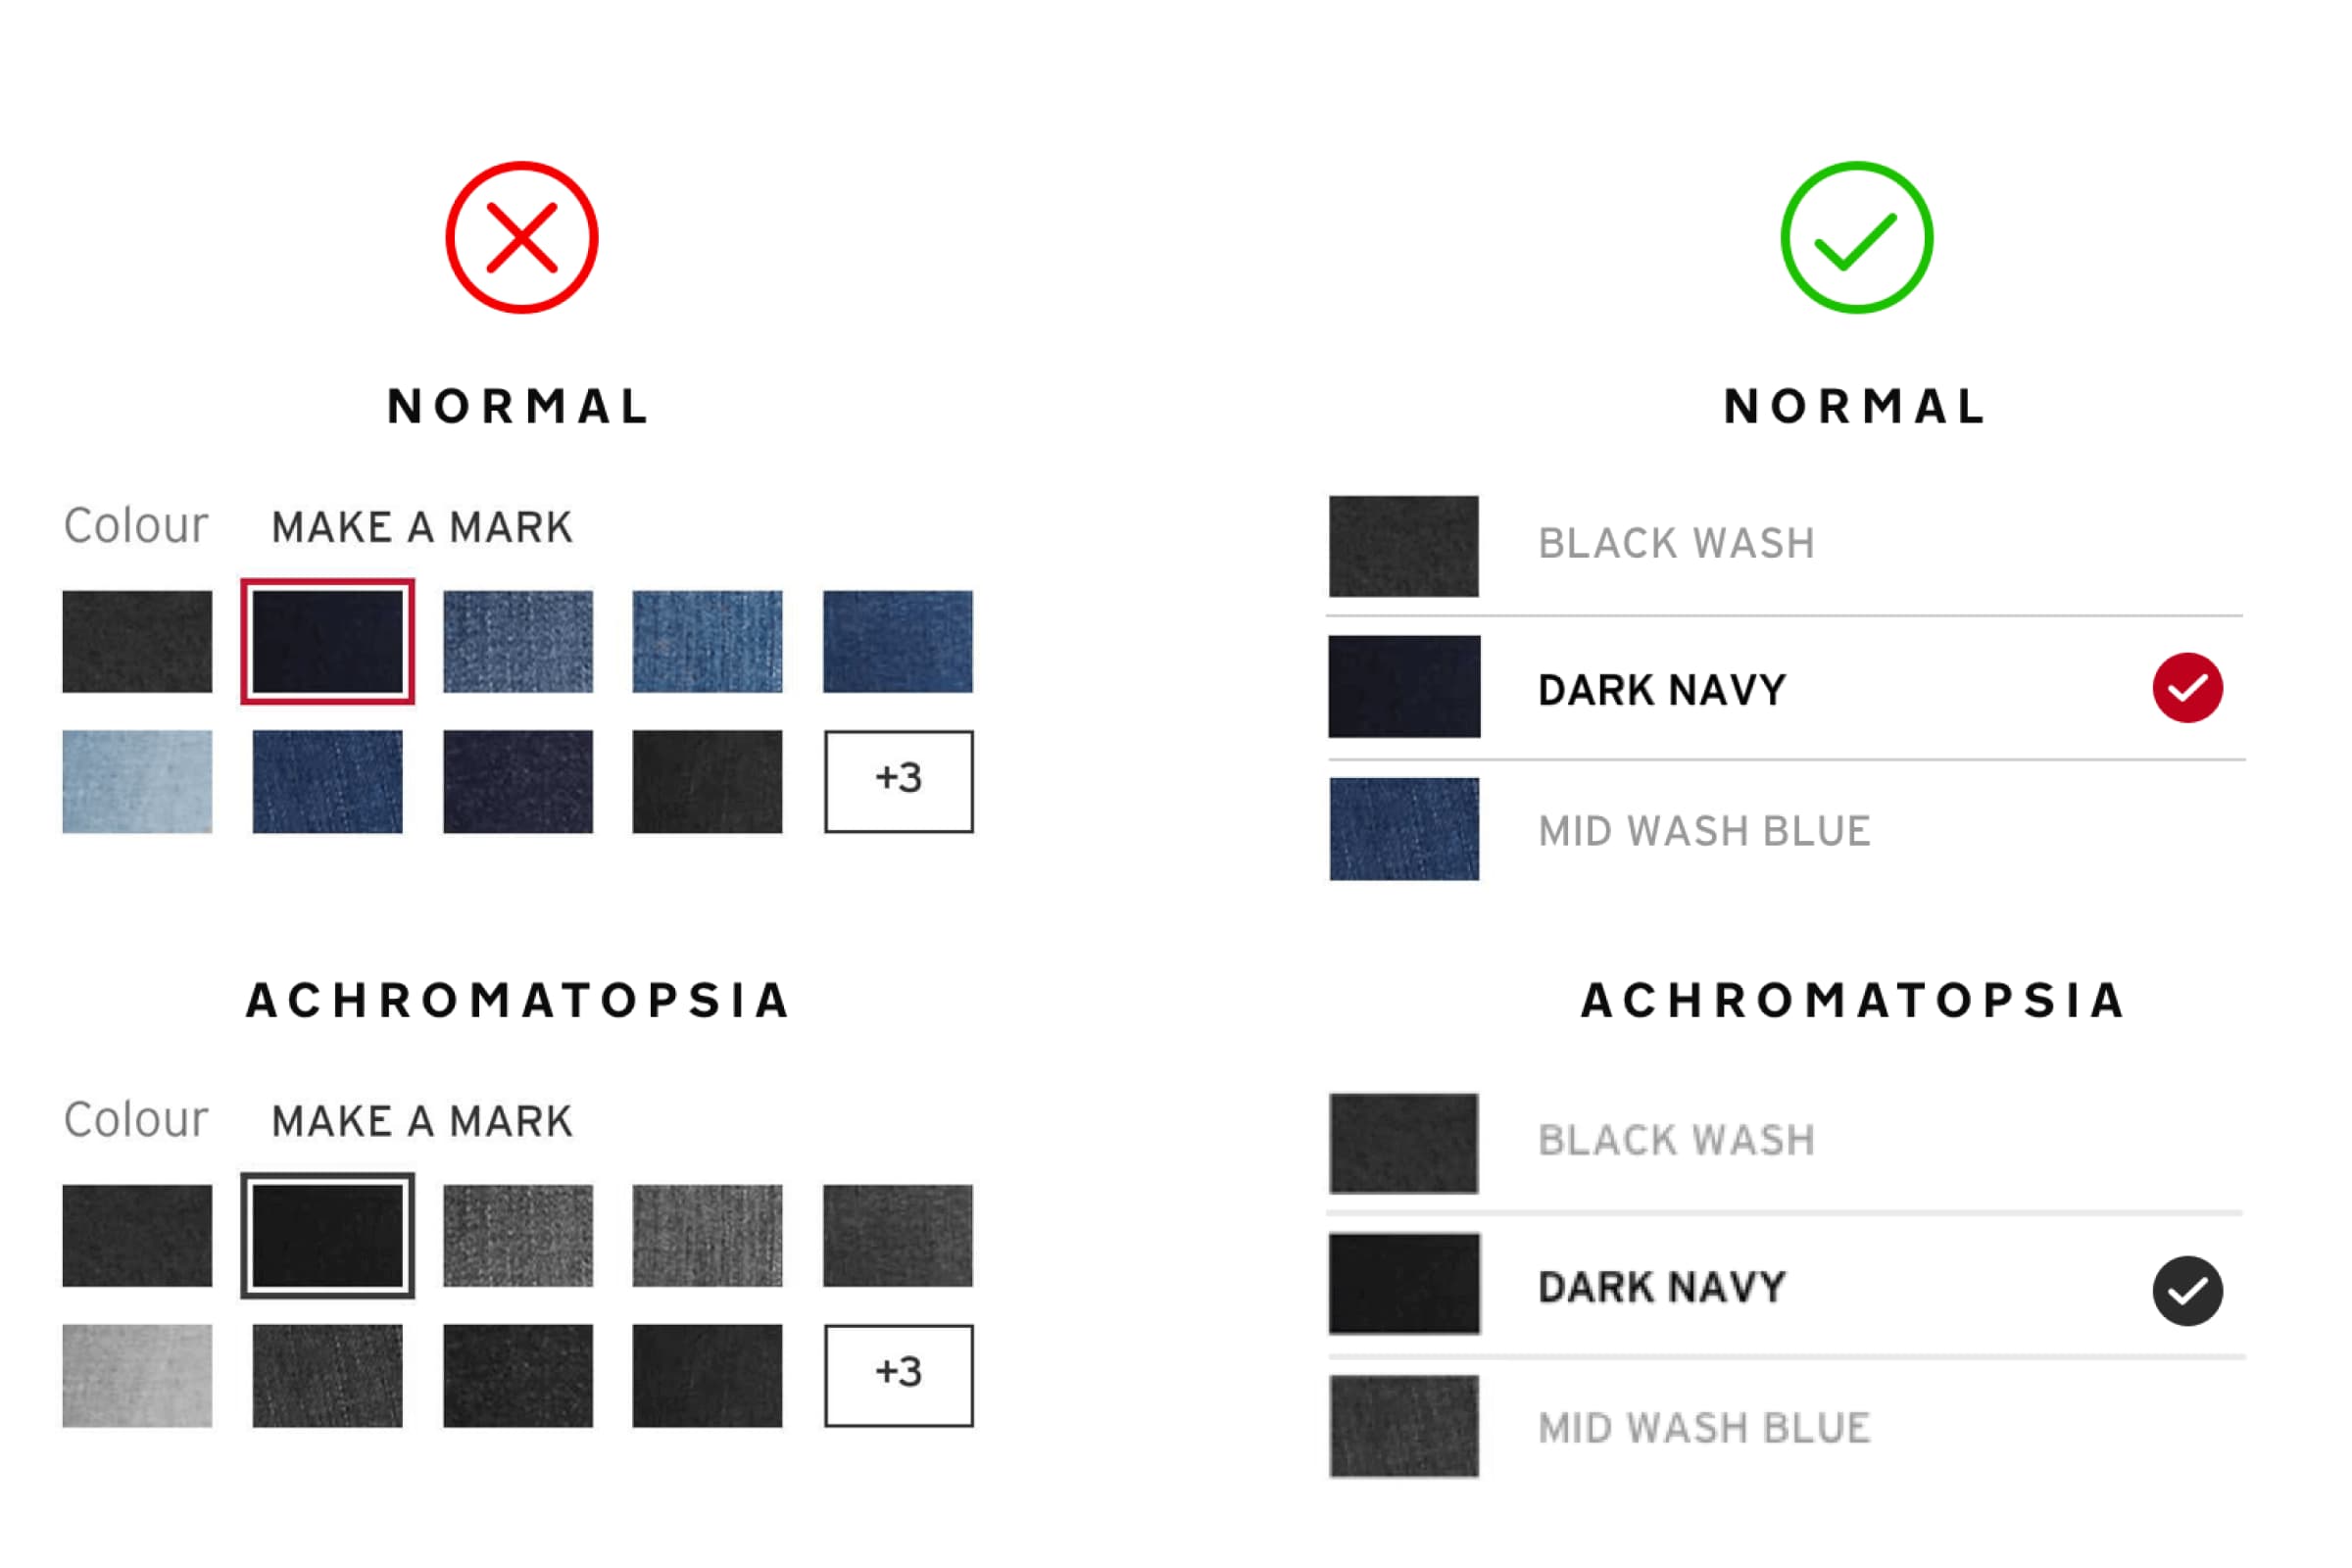
Just like a Yankee candle called “A Child’s Wish”, if we told you the colour of a pair of jeans was “Make a mark”, could you describe the colour of them? This may be a bit of fun to those who can accurately see the colour but is just irresponsible towards anyone who has a vision impairment. Creativity and inclusivity must work with each other - not against.
User Testing
Perhaps most importantly after any changes to a design, it is essential to ask for feedback! To gather feedback on the designs we have created and optimised for colour accessibility, you can conduct a round of user tests. Designs should be data-informed, however, they don’t need to be data-driven. Meaning, you could follow everything suggested here and then test your designs on your users who could come back with feedback that goes against these best practices. Making sure you’re channelling your user feedback and creating a space that is accessible is the hard part. That is where testing and prototyping will really help you find the balance.
The solutions we have demonstrated are not applicable to every solution, but the principles should help you with any future design decisions you make in order to be more inclusive for people with CVD.

Got an idea? Let us know.
Discover how Komodo Digital can turn your concept into reality. Contact us today to explore the possibilities and unleash the potential of your idea.

Sign up to our newsletter
Be the first to hear about our events, industry insights and what’s going on at Komodo. We promise we’ll respect your inbox and only send you stuff we’d actually read ourselves.


